Set up your wallet and assets
Define the working state for Execute Cross-Chain Restaking before initiating any transactions. Confirm your account, network, and asset availability to prevent common setup failures.
Keep the initial setup minimal. Connect your core wallet, verify visibility in the app, and test the primary function before adding automations or advanced rules. A clean baseline makes it easier to isolate issues if a later step fails.
Bridge assets to the restaking chain
Moving capital from your source chain to a restaking-enabled network like Ethereum is the most fragile part of the workflow. A bridge failure or exploit here locks your funds before you even begin staking. You must treat bridge selection as a security audit, not a convenience choice.
Compare bridge security and fees
Not all bridges operate with the same security model. Some use multi-sig signers, while others rely on decentralized validator networks or native protocol integrations like Chainlink CCIP. For 2026, protocols like Stargate, Wormhole, and Across have established track records, but you must verify which ones support your specific asset and destination chain.
Use a comparison table to weigh total costs against security guarantees. High fees are often a sign of higher security overhead or lower liquidity, but cheap bridges can sometimes bypass critical verification steps.
| Bridge | Security Model | Assets | Fee Range |
|---|---|---|---|
| Stargate | LayerZero (Multi-sig + Optimistic) | ETH, USDC, USDT, STG | 0.04% - 0.06% |
| Wormhole | Guardian Network (Multi-sig) | ETH, SOL, WIF, Wormhole Tokens | 0.01% - 0.10% |
| Across | Optimistic Verification + Prover | ETH, USDC, DAI, ACX | 0.05% - 0.15% |
| Chainlink CCIP | Offchain Oracle Network | Native tokens, ERC-20s | Variable by chain |
Execute the bridge transfer
Once you have selected a bridge, connect your wallet and initiate the transaction. Double-check the destination address and network. Most errors occur when users select the wrong network (e.g., sending to an Optimism address while bridging to Base).
Open your wallet and connect to the bridge interface. Ensure you are on the official bridge URL to avoid phishing sites. Verify the network status of your source chain to ensure it is active and not congested.
Choose your source chain (e.g., Arbitrum, Optimism) and your destination chain (e.g., Ethereum). Select the asset you wish to bridge. If the asset is not native to the destination, the bridge will wrap it (e.g., bridging ETH to WETH).
Check the estimated time and total fees. Bridges often require a small amount of the destination chain’s native token for gas. Ensure you have enough balance on the source chain to cover both the transfer and the source chain gas fees.
Approve the transaction in your wallet. Wait for the bridge to complete the transfer. This can take anywhere from a few seconds to 30 minutes depending on the bridge’s security model. Do not close your browser until you see a success confirmation.
Verify receipt on the destination chain
After the bridge confirms, switch your wallet to the destination network and check your balance. If the asset does not appear, you may need to import the token contract address manually. Once verified, you are ready to proceed to the restaking protocol.
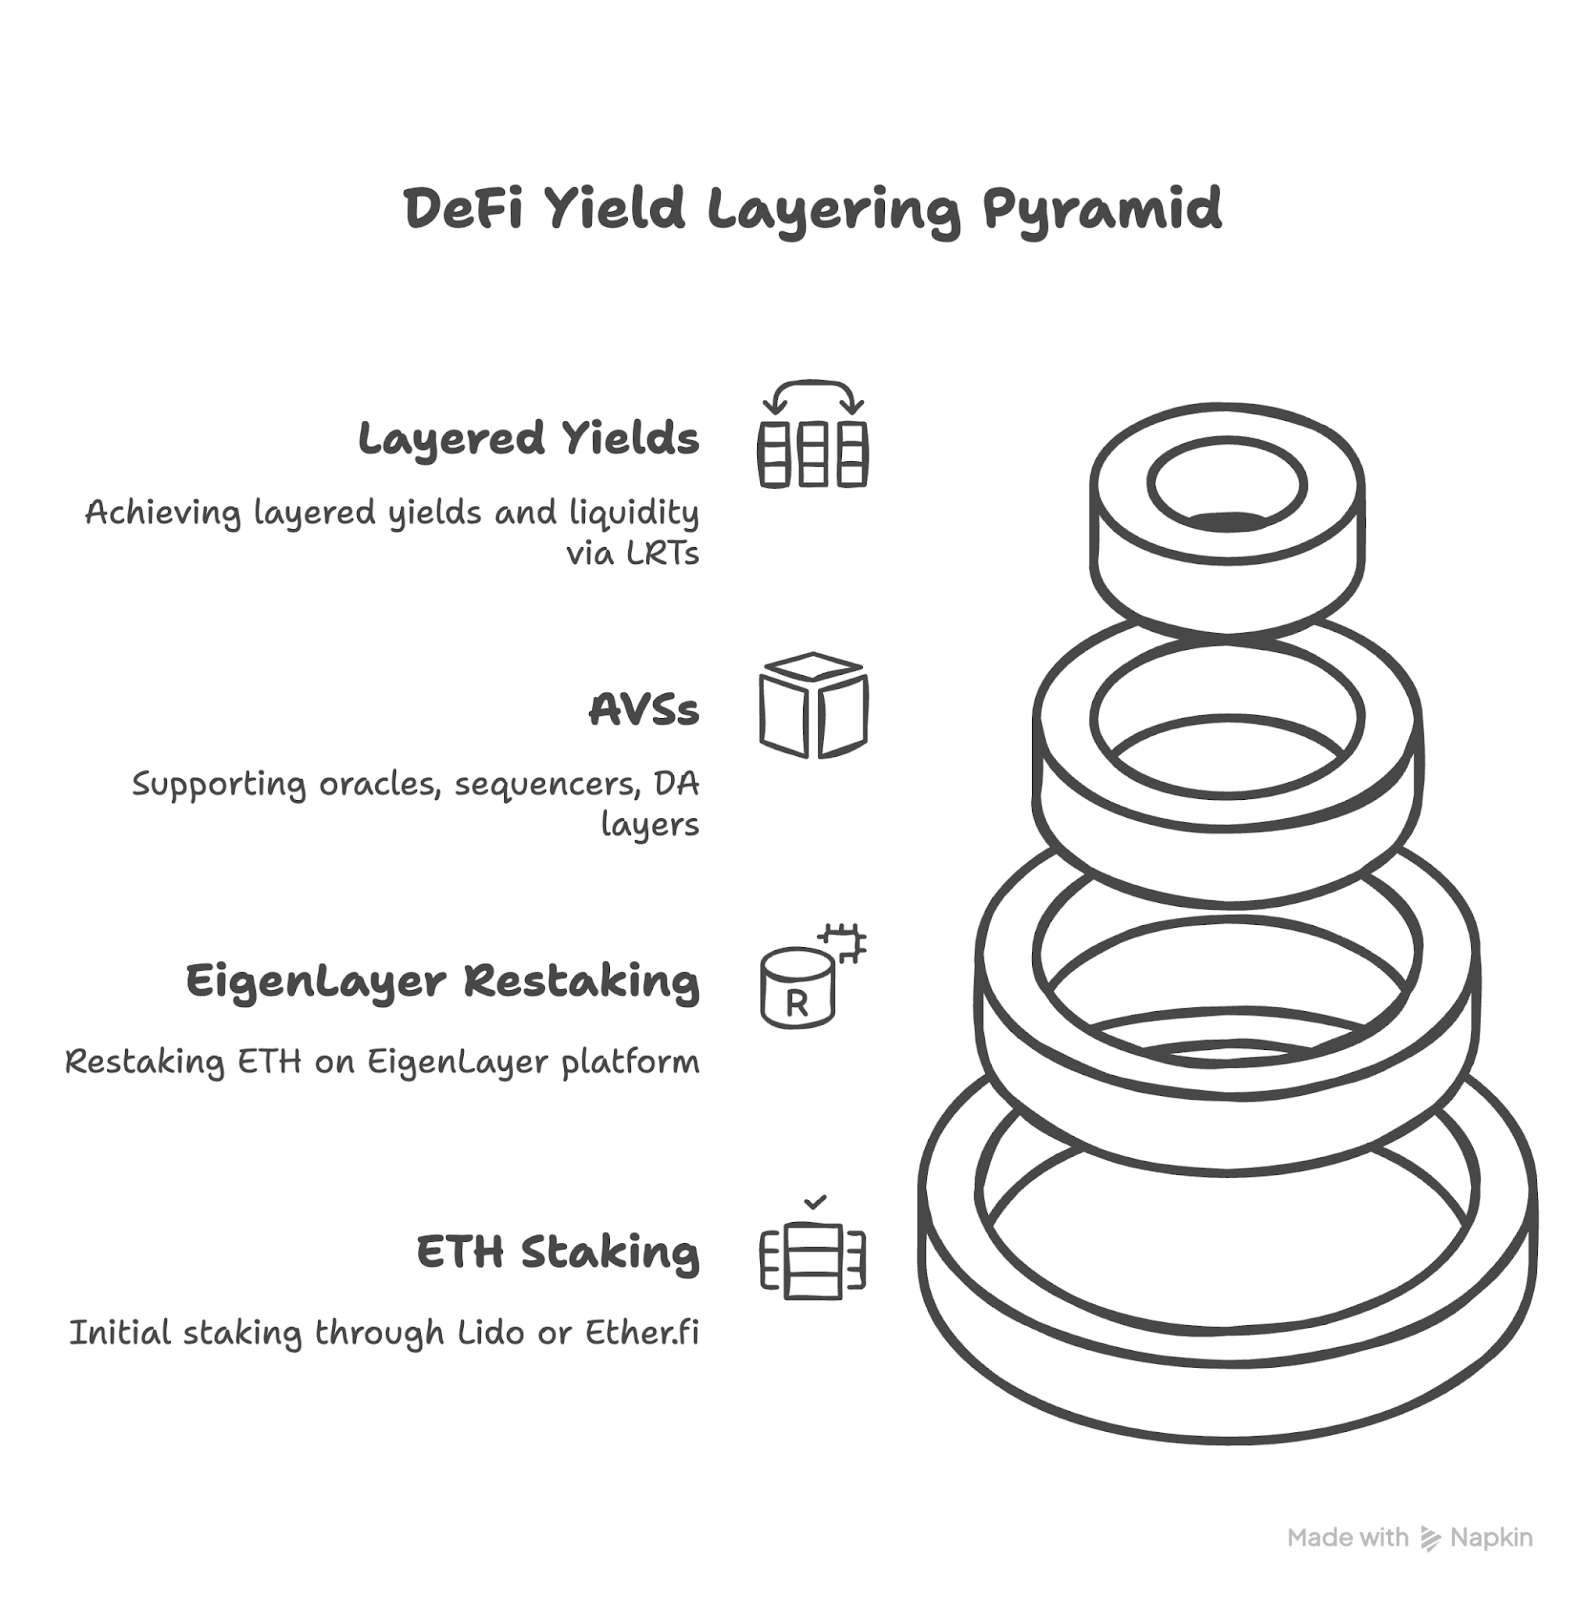
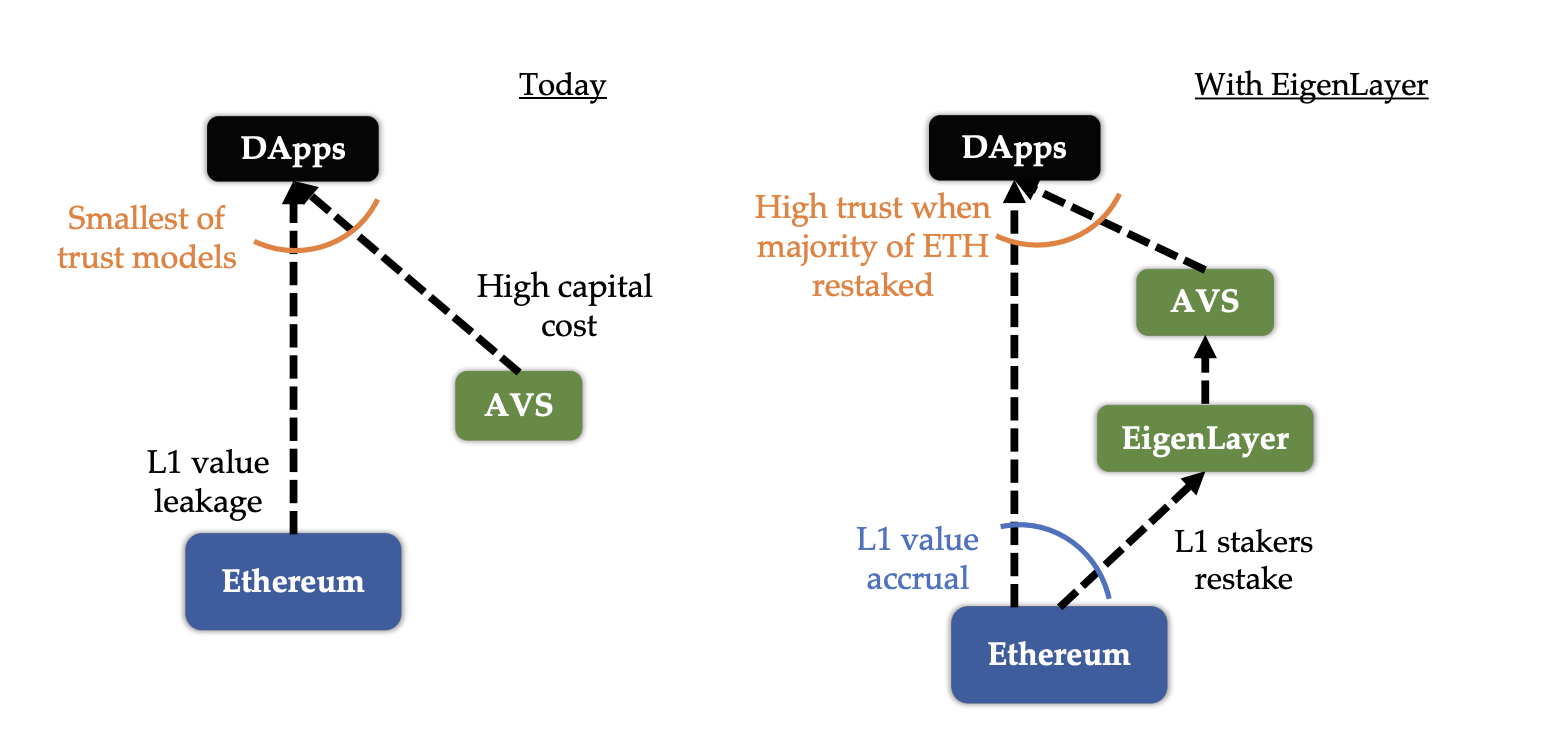
Stake ETH on the source chain
Cross-chain restaking begins on Ethereum, the primary chain where your ETH lives. You must deposit ETH or staked ETH into a Liquid Restaking Token (LRT) provider like EigenLayer. This step locks your assets in the Ethereum consensus layer while generating a liquid receipt token that represents your staked position.
This receipt token is the bridge to the rest of the ecosystem. It allows you to participate in restaking protocols without sacrificing the liquidity or yield of your original staking position. Without this initial deposit on Ethereum, you cannot mint the tokens required for cross-chain delegation.
1. Connect your wallet
Navigate to the EigenLayer dashboard and connect your Web3 wallet, such as MetaMask or Rabby. Ensure you are on the Ethereum mainnet and have enough ETH to cover both the staking amount and the gas fees for the transaction.
2. Deposit ETH or stETH
Select the "Deposit" option and choose your asset. You can deposit native ETH or liquid staking tokens like stETH from Lido. The protocol will automatically convert your deposit into eETH (EigenLayer ETH), which serves as your liquid receipt token.
3. Confirm and finalize
Review the transaction details in your wallet, including the gas fees and the amount of eETH you will receive. Confirm the transaction and wait for the block confirmation on Ethereum. Once confirmed, your eETH balance will appear in your wallet, ready for cross-chain restaking.
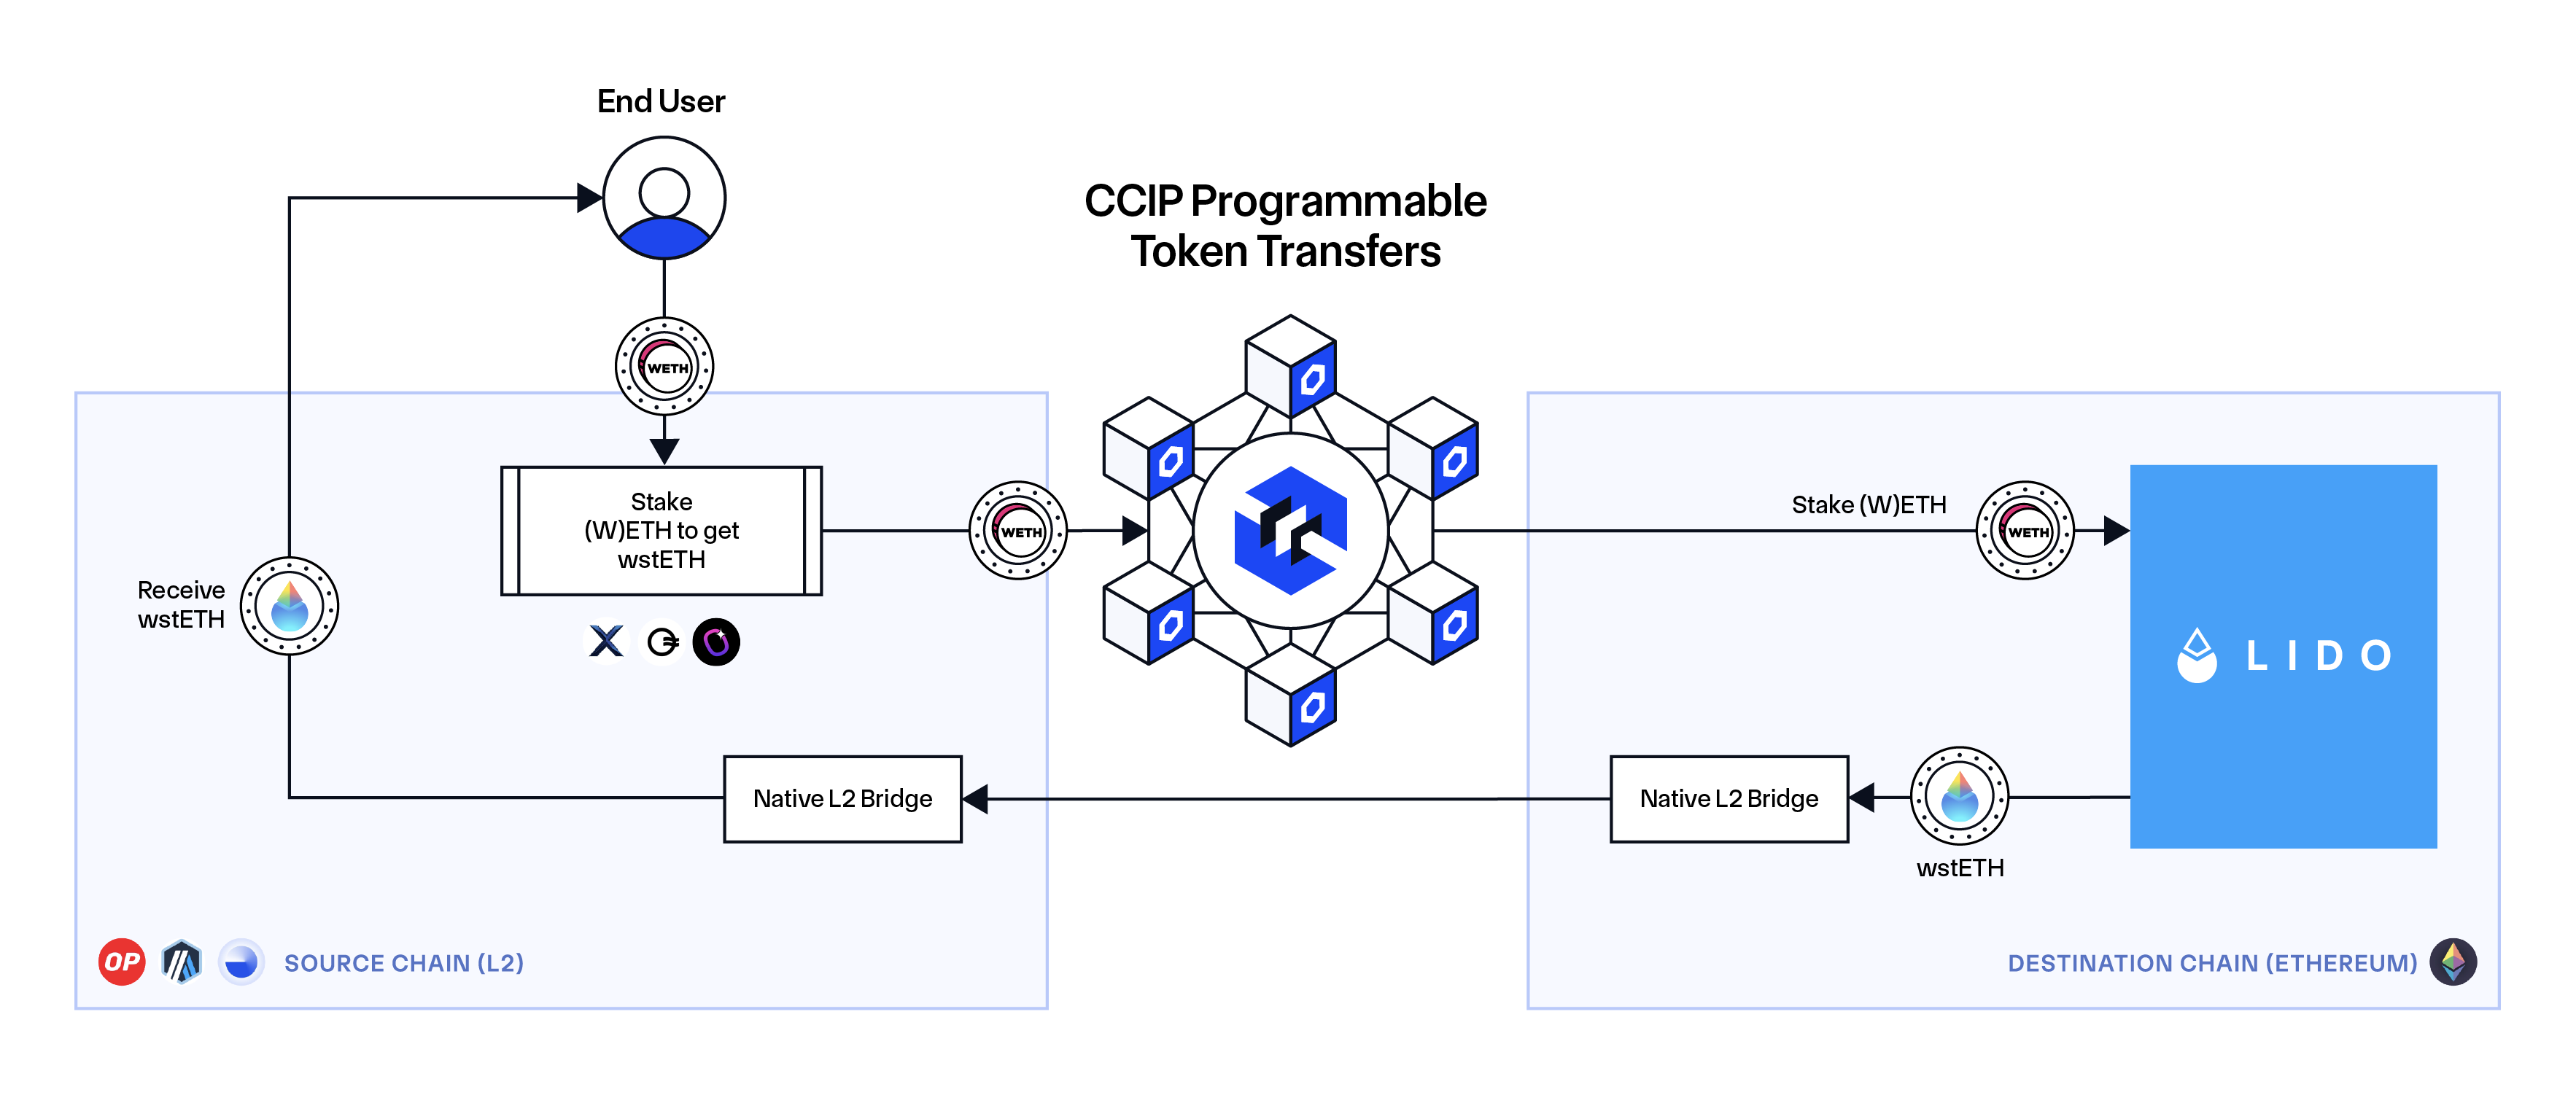
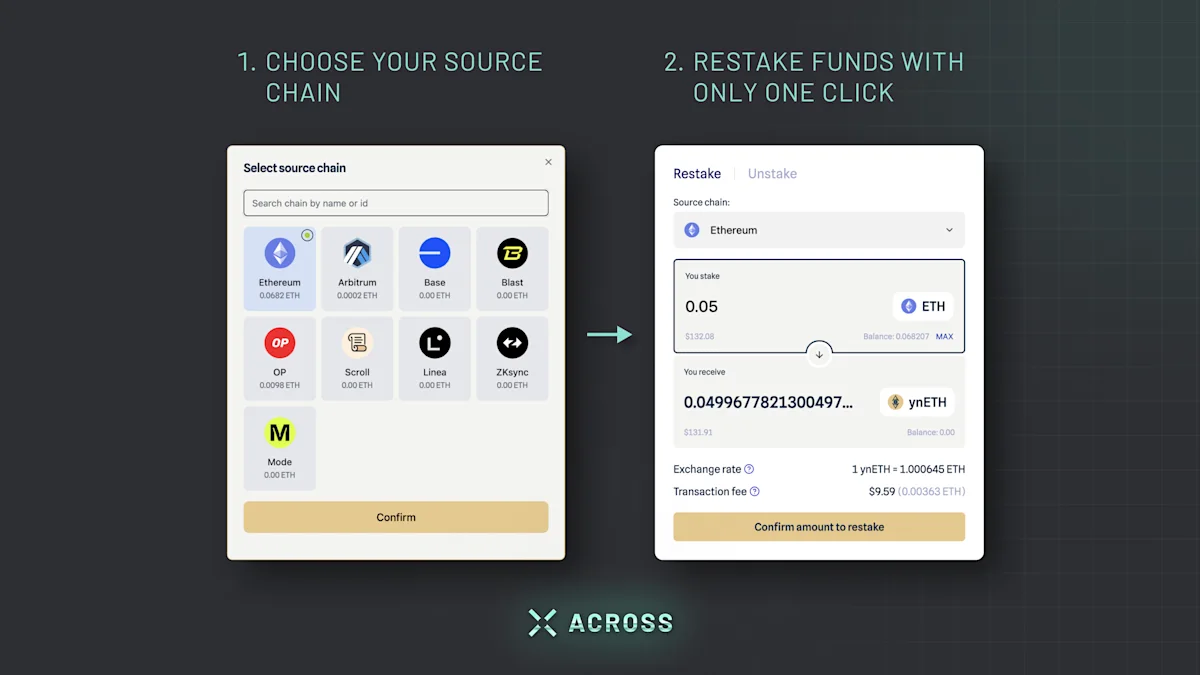
Deploy LRT to a cross-chain protocol
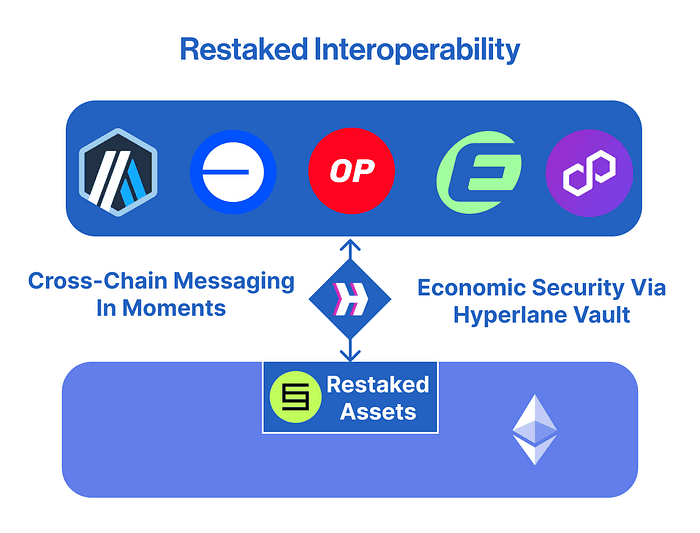
Cross-chain restaking allows you to deploy Liquid Restaking Tokens (LRTs) to a secondary chain, providing security or liquidity to another ecosystem while earning additional yield. This process leverages chain abstraction protocols to move your staked assets across different blockchains without unwrapping them.
The mechanism relies on bridges or native interoperability layers to transport the LRT. Once on the destination chain, the LRT can be used in lending markets, provided as liquidity, or restaked again depending on the protocol’s design.
Identify a cross-chain liquidity protocol that supports your specific LRT. Check if the protocol uses a bridge-fed or solver-networked model. Ensure the destination chain offers the yield opportunities you seek, such as lending markets or liquidity pools.

Connect your wallet to the cross-chain protocol. Select your LRT as the asset to transfer and choose the destination chain. Review the transfer fees, which include gas costs on both the source and destination chains, as well as any bridge fees.
Approve the transaction in your wallet. Monitor the transfer status until the LRT appears in your wallet on the destination chain. Once confirmed, interact with the destination protocol to provide security or liquidity, thereby activating the additional yield generation.
Monitor slashing and bridge risks
Cross-chain restaking amplifies rewards but multiplies attack surfaces. You are no longer just trusting a single validator; you are trusting the bridge that moves your assets and the oracle that verifies messages across chains. A failure in either layer can result in total loss.
Track bridge security status
Bridge exploits remain the most common vector for loss. Protocols often rely on LayerZero or similar cross-chain messaging standards, which have been targeted by attackers forging messages or draining liquidity. For example, KelpDAO lost $292 million in April 2026 when attackers forged a cross-chain message through its LayerZero bridge, draining 18% of the rsETH supply [src-serp-7]. More recently, Thorchain paused all trading after a $10.8 million exploit across Bitcoin and other chains [src-serp-6].
Set up alerts for your specific bridge provider. Do not assume the protocol’s smart contract is the only point of failure; the messaging layer is often the weak link. Check the protocol’s official status page or Twitter account for immediate pause events.
Watch for slashing conditions
Slashing is not just a validator penalty; in cross-chain restaking, it can be triggered by bridge failures or oracle discrepancies. If the cross-chain message verifier fails to validate a state change correctly, your staked assets may be penalized or locked.
Monitor the slashing conditions published by your restaking protocol. These documents specify exactly what constitutes a valid vs. invalid cross-chain action. If a bridge experiences downtime or a message delay, your restaking position may be at risk. Use a block explorer to watch for any unusual validator behavior or failed message verifications on the destination chain.
Common cross-chain restaking mistakes
Cross-chain restaking amplifies risk by layering bridge exposure on top of validator staking. A single failure in the bridge or liquidity pool can drain the entire position. To protect capital, you must treat the bridge as a separate, high-risk component that requires its own due diligence.
Using unaudited or niche bridges
Many new cross-chain protocols launch with aggressive marketing but lack formal security audits or bug bounties. Relying on these unverified protocols exposes your restaked assets to smart contract vulnerabilities. Stick to bridges with a proven track record and multiple layers of security, such as multi-sig governance or ZK-proof verification.
Ignoring gas fees and slippage
Restaking across chains often involves multiple transactions: bridging assets, depositing into a restaking contract, and claiming rewards. Each step incurs gas fees that can erode returns, especially on congested networks. Additionally, liquidity fragmentation can cause significant slippage. Always calculate the total cost of the transaction chain, not just the bridge fee.
Overlooking validator slashing conditions
Restaking increases your exposure to slashing events. If you restake across chains, ensure you understand the slashing conditions of each underlying protocol. A misconfigured validator on one chain can lead to penalties that affect your entire restaking position. Read the documentation for each restaking layer carefully.
Checklist before executing
-
Verify the bridge has a current security audit from a reputable firm.
-
Calculate total gas fees for all steps in the transaction.
-
Confirm the validator’s slashing conditions across all chains.
-
Check liquidity depth to minimize slippage.
-
Ensure your wallet supports all required networks.
Frequently asked questions about cross-chain restaking
Cross-chain restaking allows you to secure multiple networks with a single asset, but the mechanics differ from standard staking. Understanding the yield sources and risk layers is essential before deploying capital.
No comments yet. Be the first to share your thoughts!