Choose your restaking path
Selecting a restaking protocol requires matching your asset base to the correct security model. The primary decision is whether to restake natively on Ethereum or bridge assets to other chains. Native restaking offers the highest security floor but limits you to the Ethereum ecosystem. Cross-chain restaking expands yield opportunities but introduces bridge risk and slashing complexity.
Native Ethereum restaking
Native restaking involves locking staked ETH (stETH) or liquid staking tokens (LSTs) directly on Ethereum. This path avoids cross-chain bridges entirely, eliminating bridge exploit risk. Protocols like EigenLayer use these assets to secure additional decentralized services (Actively Validated Services). The tradeoff is lower diversification; your risk is concentrated in Ethereum’s consensus layer. If you prioritize capital preservation and security over maximum yield, native restaking is the standard choice.
Cross-chain bridged restaking
Cross-chain restaking moves assets to other blockchains via interoperability protocols. This exposes your capital to bridge vulnerabilities and potential slashing events if the destination chain’s validator set is compromised. Protocols like Babylon allow Bitcoin staking without bridges, but most other cross-chain options require bridging. This path offers higher potential yields but requires active monitoring of bridge health and slashing conditions. Use official bridge documentation to verify security audits before depositing.
| Feature | Native (ETH) | Cross-Chain |
|---|---|---|
| Security Model | Ethereum consensus | Bridge + Destination chain |
| Bridge Risk | None | High (exploit/slashing) |
| Yield Potential | Moderate | Variable (higher risk) |
| Complexity | Low | High |


As an Amazon Associate, we may earn from qualifying purchases.
Prepare your wallet and assets
Before you attempt a cross-chain restaking transaction, you must ensure your wallet is configured correctly and your assets are positioned on the right chains. Cross-chain restaking involves moving capital between distinct networks and interacting with multiple smart contracts. If your wallet is missing the native gas token for the destination chain, or if your assets are stuck on the source chain, the transaction will fail. More critically, attempting to bridge large sums without verifying security can expose you to bridge exploits or slashing penalties.
Verify your gas tokens
Every blockchain requires a native token to pay for transaction fees (gas). If you are restaking ETH on Ethereum Mainnet, you need ETH. If you are bridging to a Layer 2 like Arbitrum or Optimism, you need ETH on that specific chain. Do not assume your mainnet balance covers cross-chain costs.
- Check your balance on the source chain (where your assets currently reside).
- Check your balance on the destination chain (where you want to restake).
- If the destination balance is zero, bridge a small amount of native gas token first. Use a reputable bridge like Stargate or Wormhole for this initial transfer. Stablecoin Insider provides a 2026 review of reliable cross-chain bridges.
Bridge your restaking assets
You must move your principal assets (e.g., ETH, stETH, or LRTs) to the destination chain before initiating the restaking protocol. Never attempt to restake assets that are still on the source chain; the smart contracts on the destination chain will not recognize them.
- Select the correct bridge: Use a bridge with high TVL and a strong security track record. Avoid obscure bridges with low liquidity.
- Confirm asset compatibility: Ensure the token you are bridging is supported by the restaking protocol on the destination chain. For example, if the protocol accepts only native ETH, you must bridge ETH, not a wrapped version, unless the protocol explicitly supports wrapped variants.
- Wait for finality: Bridge transactions can take anywhere from a few minutes to several hours depending on network congestion and bridge security models. Do not proceed until the funds appear in your wallet on the destination chain.
Review security risks
Cross-chain activity carries higher risk than single-chain operations. Bridge hacks are a frequent vector for loss. Additionally, restaking involves slashing conditions where you may lose principal if the validator you delegate to misbehaves.
- Check bridge audits: Verify that the bridge you are using has been audited by reputable firms.
- Understand slashing: Read the restaking protocol’s documentation on slashing conditions. Know exactly what actions could cause you to lose funds.
- Start small: For your first cross-chain restaking transaction, use a minimal amount to test the entire flow before committing significant capital.
Bridge assets to the target chain
Moving your staked assets to the destination chain is the most vulnerable phase of cross-chain restaking. Bridges are the primary attack vector for cross-chain exploits, and a failed bridge transaction can result in permanent loss of capital before any restaking rewards are generated. You must treat the bridging step with the same rigor as securing your private keys.
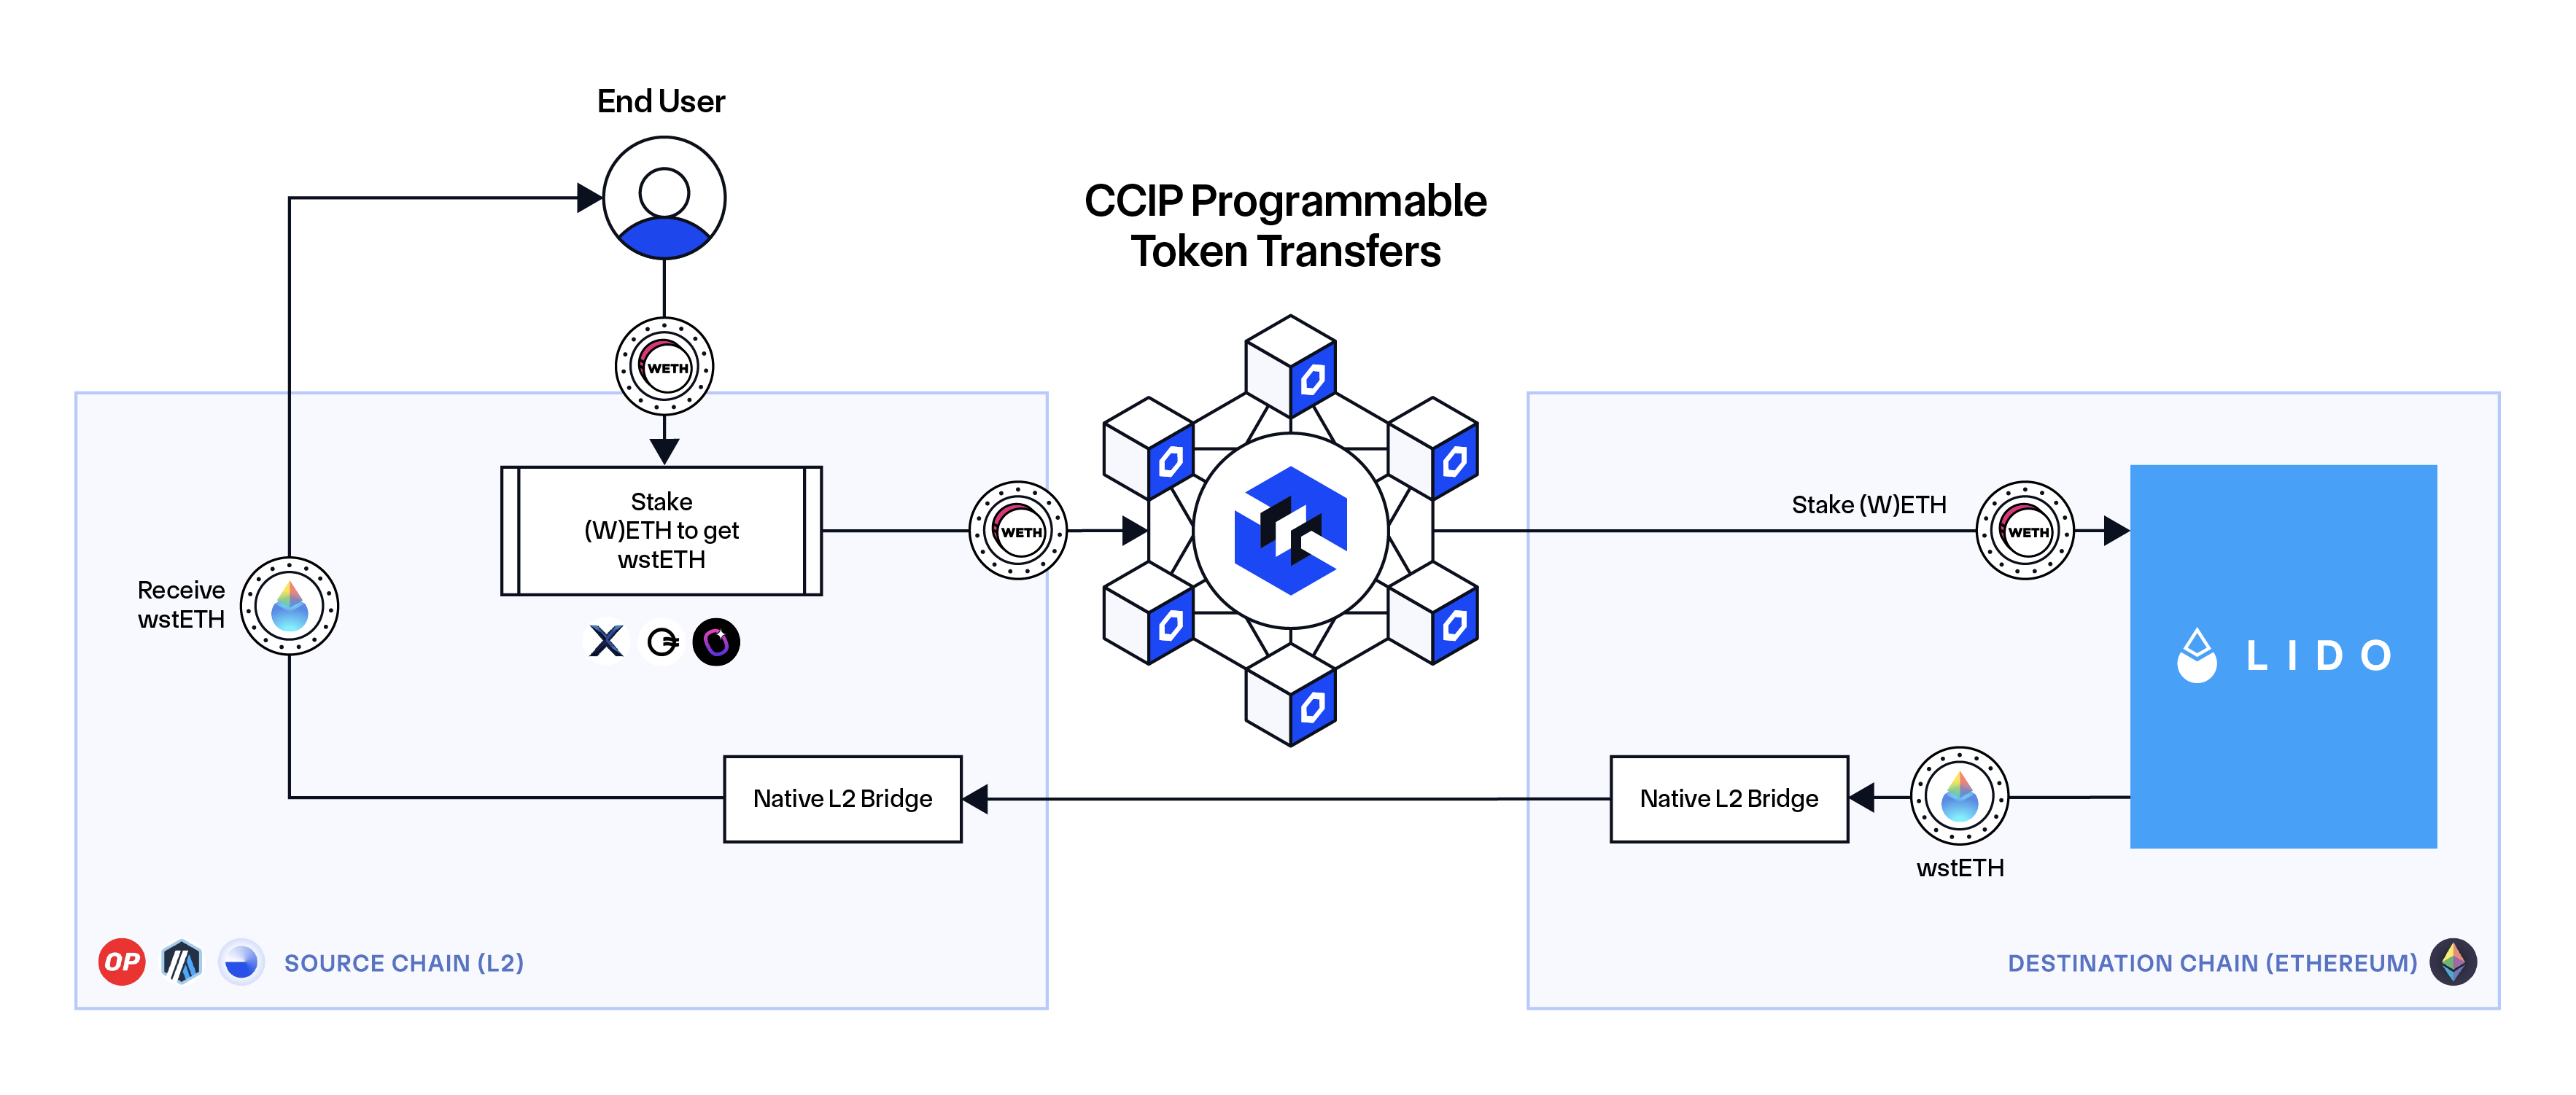
Start by selecting a bridge with a proven track record and robust security audits. In 2026, protocols like Chainlink CCIP have processed over $18 billion in cross-chain volume, offering a level of institutional-grade security that newer, untested bridges lack. While options like Wormhole and Stargate remain popular, prioritize bridges that integrate with established liquidity networks rather than experimental solvers. Always verify the bridge’s official URL through the restaking protocol’s documentation to avoid phishing sites.
Once you have selected your bridge, connect your wallet and initiate the transfer. Most interfaces will display the estimated gas fees on both the source and destination chains, as well as the expected arrival time. Be aware that some bridges use optimistic validation periods, meaning your funds may not appear immediately. During this window, do not attempt to repeat the transaction, as this could lead to double-spending or stuck funds.
Navigate to the official website of your chosen cross-chain bridge. Ensure the URL matches the official documentation provided by the restaking protocol. Click the "Connect Wallet" button and approve the connection in your wallet interface. Verify that the source chain is set to your current network (e.g., Ethereum) and the destination chain is set to the target L2 or sidechain for your restaking activity.
Enter the amount of assets you wish to bridge. If this is your first time using the bridge, you will need to approve the token contract to spend your assets. Review the approval limit carefully; some bridges require unlimited approvals, while others allow you to set a specific cap. Confirm the transaction in your wallet and wait for the source chain confirmation. Note the gas fee paid for this approval.
After the source transaction is confirmed, the bridge will process the transfer. This may take anywhere from a few seconds to several minutes, depending on the bridge’s validation mechanism. Use the bridge’s built-in status tracker or a block explorer to monitor the transaction hash. Do not close the browser tab or disconnect your wallet until the destination transaction is fully confirmed and the assets appear in your wallet on the target chain.
Once the assets arrive on the destination chain, double-check that they are in the correct wallet address and that the network matches the requirements of the restaking protocol. Only then should you proceed to the next step of depositing your assets into the restaking contract.
Stake and restake your assets
With your assets bridged to the destination chain, the final step is depositing them into a restaking protocol. This action locks your capital to secure additional decentralized networks, generating dual yields from both the base staking rewards and the restaking incentives. Because you are layering security responsibilities, the risk profile increases significantly if the underlying protocols fail.
Cross-chain restaking introduces two distinct risks. First, bridge exploits can drain funds during the transfer phase. Second, if the restaking protocol suffers a failure or if you act as a validator node, slashing events can permanently reduce your principal. Only stake amounts you can afford to lose.
Monitor for slashing and bridge risks
Cross-chain restaking introduces two distinct failure modes: bridge exploits and slashing penalties. Unlike native restaking, where risks are confined to a single chain, cross-chain protocols require your assets to traverse external messaging layers. These layers are historically the weakest point in DeFi security.
Bridges are the most frequent target for exploits. Always verify that the cross-chain protocol you use has undergone multiple independent audits and has a proven track record of handling large value transfers without incident.
When you restake across chains, you are trusting the bridge to correctly relay state. If the bridge is compromised, your staked assets can be drained. This risk is compounded by the fact that many cross-chain solutions rely on optimistic verification or multi-signature schemes that can be slow to react to attacks.
Slashing remains a secondary but critical concern. If the validator you delegated to misbehaves on the destination chain, the slashing conditions are enforced by the restaking protocol. In a cross-chain context, determining which chain’s rules apply can be complex. Ensure you understand the specific slashing triggers for each network involved in your restaking strategy.
To mitigate these risks, prioritize protocols that minimize bridge exposure. For example, some modern restaking architectures, like Babylon, avoid cross-chain bridge exposure entirely by operating on a single chain. When cross-chain functionality is necessary, choose the most audited and established pathways available, and monitor their security status regularly.
Withdraw and bridge back
Exiting a cross-chain restaking position requires careful timing and execution. Unlike standard staking, you cannot simply sell your assets; you must first reverse the locking mechanism and then move the funds across the bridge. This process involves two distinct phases: unbonding on the destination chain and bridging back to the source chain.
Before initiating any withdrawal, check the unbonding period for your specific restaking protocol. This window can range from a few days to several weeks. During this time, your assets are locked and cannot be moved. Ensure you have enough gas on the destination chain to cover transaction fees throughout this period.
Submit the withdrawal request on the destination chain where your assets are currently staked. This action triggers the unbonding timer. Once the period expires, your liquid restaking tokens (LRTs) or underlying assets will be unlocked and available in your wallet on that chain. Do not attempt to bridge while the assets are still in the unbonding state.
With your assets unlocked, use a trusted bridge to transfer them back to your original source chain. Prioritize bridges with strong security audits and high total value locked (TVL) to minimize the risk of exploits. Always double-check the bridge’s official URL to avoid phishing sites. Once the transaction is confirmed, your funds are back in your primary wallet.
Cross-chain bridges are frequent targets for hackers. Never connect your wallet to unverified bridge interfaces. Use only official bridge links from the restaking protocol’s documentation or reputable aggregator services. Consider using multi-signature wallets or hardware wallets for large withdrawals to add an extra layer of security.
Common cross-chain restaking: what to check next
Cross-chain restaking introduces unique risks that don’t exist in single-chain staking. Understanding the mechanics of yield distribution and security layers is essential before deploying capital.
No comments yet. Be the first to share your thoughts!