Prepare your wallet and assets
Before initiating a cross-chain restaking transaction, ensure your wallet is configured for both the source and destination networks. Cross-chain operations require native gas tokens on each chain involved in the transfer. If you are restaking from Solana to an Ethereum Layer 2, you must hold SOL for the source transaction and ETH (or the L2’s native token) for the destination gas.
Next, verify that your wallet supports the specific cross-chain protocol you intend to use. Many wallets allow you to add custom RPC endpoints or enable specific chain networks in settings. For instance, if you are using a protocol like Chainlink CCIP to scale restaking, confirm your wallet can interact with the required smart contracts on both sides of the bridge. A wallet configured only for Ethereum mainnet will fail to execute a transaction on a niche L2 or sidechain.
Finally, check your asset balances. Ensure you have enough of the source asset to cover the transfer amount plus all associated fees. Some cross-chain bridges charge a premium for liquidity routing, while others may have minimum transfer thresholds. Leaving a small buffer above the estimated fee prevents failed transactions that could result in lost gas costs.
Bridge assets using trusted infrastructure
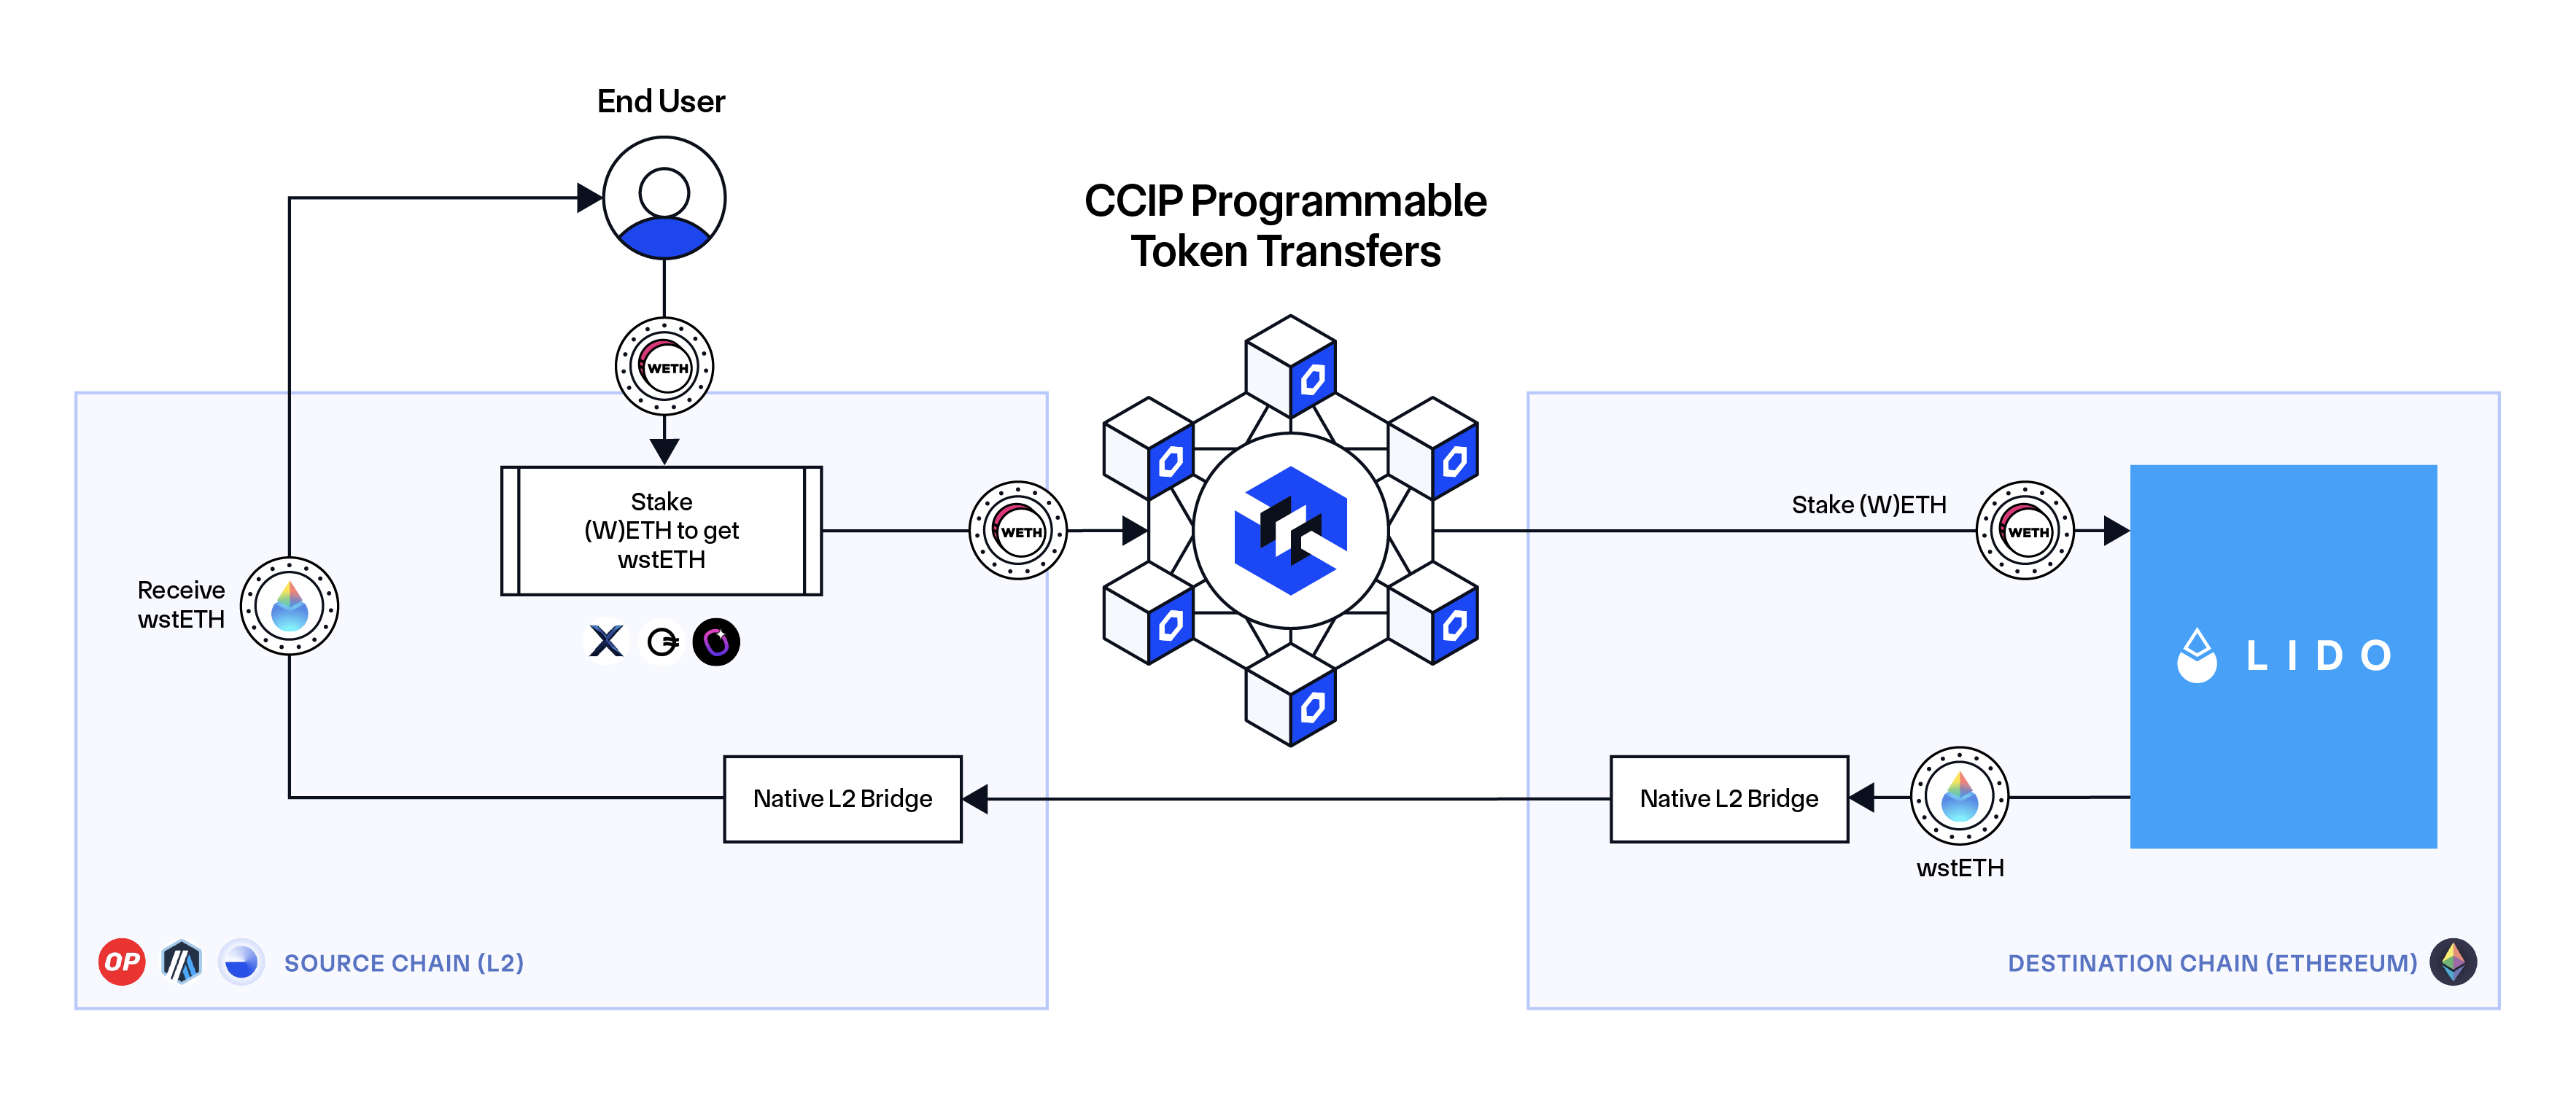
Cross-chain restaking requires moving assets and state between disconnected blockchains. The safest path relies on trustless messaging protocols rather than custodial bridges. Custodial bridges hold your funds in a multi-sig wallet, creating a single point of failure. Trustless protocols like Chainlink CCIP or Celer IM verify transactions cryptographically, removing the need to trust a centralized operator with your capital.
1. Select a trustless bridge
Choose a protocol that supports your target chain and asset. Chainlink CCIP provides a unified interface for secure cross-chain communication, enabling users to stake ETH directly from Layer-2 networks to Ethereum [src-serp-2]. Celer IM (Interchain Messaging) offers a similar capability, allowing users to bridge assets along with a message to stake them on the destination chain [src-serp-4].


2. Verify destination contract
Before interacting with the restaking protocol on the destination chain, verify that the bridge has correctly deposited your assets. Check the destination chain's block explorer to confirm the token balance. Ensure the restaking contract address matches the official documentation from the protocol provider.
3. Execute restaking
Once your assets are confirmed on the destination chain, interact with the restaking protocol (e.g., EigenLayer, Ether.fi). Deposit your bridged assets into the restaking contract. This action locks your assets and begins the process of earning restaking rewards while providing security to the network.
-
Verify bridge protocol supports your asset and chain pair
-
Check destination chain gas fees before bridging
-
Confirm restaking contract address on official documentation
-
Monitor transaction status on both source and destination chains
Deposit into a restaking protocol
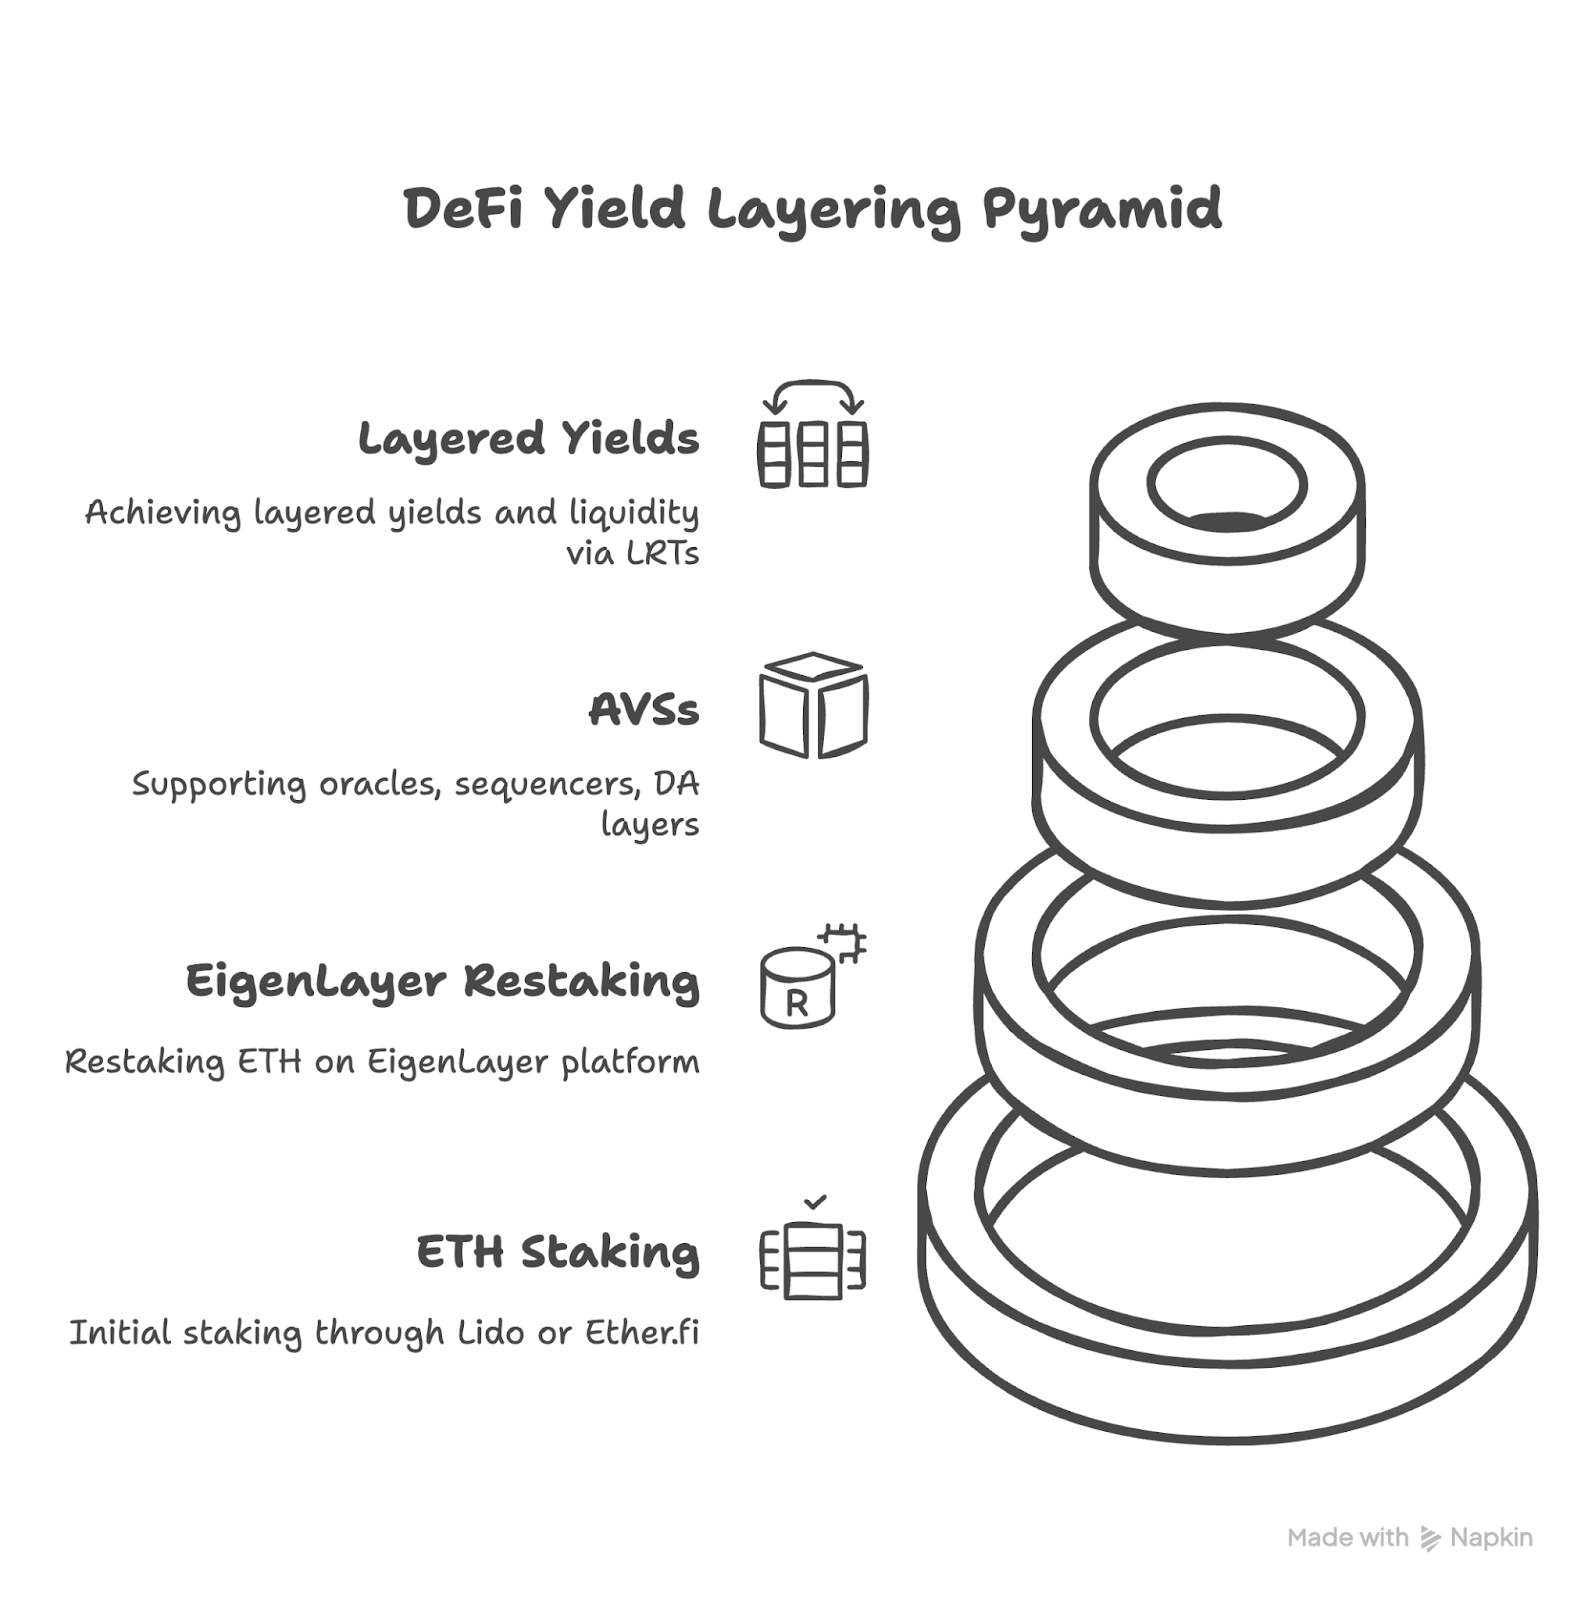
Once your assets are bridged to the destination chain, you must interact with a restaking layer to activate yields. Unlike standard staking, this step locks your assets to provide security to multiple protocols simultaneously. You will typically bridge a liquid staking token (LST) or native asset, then deposit it into a protocol-specific vault. The three dominant entry points for cross-chain restaking in 2026 are EigenLayer, Renzo, and Kernel.
1. Deposit into EigenLayer via EigenCloud
EigenLayer is the primary restaking settlement layer on Ethereum. For cross-chain users, the entry point is often EigenCloud, which aggregates restaking opportunities across multiple chains. You will connect your wallet to the EigenCloud interface, select the asset you bridged (such as rETH or ezETH), and approve the vault contract.
EigenCloud allows you to choose specific Actively Validated Services (AVSs) to delegate your restaked security to. This step is critical because your yield and risk profile depend on the AVSs you select. Ensure you review the slashing conditions for each AVS before confirming the transaction. The process is non-custodial, meaning you retain ownership of your underlying assets while the protocol manages the delegation logic.
2. Restake via Renzo Flow Vaults
Renzo offers a streamlined approach through its Flow Vaults, which are designed to unlock cross-chain, multi-asset restaking. Unlike direct interactions with EigenLayer, Renzo acts as a liquid restaking token (LRT) protocol that simplifies the delegation process. You deposit your bridged asset into a Renzo vault, and the protocol automatically manages the restaking distribution across EigenLayer and other integrations.
This method is particularly useful for users who want to restake assets on chains like Arbitrum or BNB Chain without navigating complex multi-step delegation processes. Renzo handles the bridging of restaked positions and the aggregation of yields. When you deposit, you receive ezETH (or a chain-specific variant) as a receipt token, which represents your restaked position and can be used in other DeFi protocols for additional yield.
3. Bridge to Kernel on BNB Chain
For users focused on the BNB Chain ecosystem, Kernel is a leading restaking platform that has expanded its reach through partnerships like Brevis. Kernel enables trustless cross-chain restaking by allowing BNB Chain users to restake assets and provide security to AVSs on the BNB Chain network. You will bridge your assets to BNB Chain, then deposit them into the Kernel vault.
Kernel’s integration with Brevis allows for cross-chain data verification, ensuring that restaking positions are securely tracked across chains. This is particularly important for maintaining yield consistency and security guarantees when your assets originate from Ethereum. The process involves approving the Kernel contract and selecting the specific restaking strategy that aligns with your risk tolerance. Always verify the contract address on Kernel’s official documentation to avoid phishing risks.
Key Considerations for Deposit
- Gas Costs: Cross-chain restaking requires gas on both the source and destination chains. Ensure you have sufficient native tokens (ETH, BNB, etc.) for the destination chain transaction.
- Slashing Risk: Restaking increases slashing exposure. If an AVS you are supporting fails, your restaked assets may be penalized. Review the AVS’s track record and security model.
- Liquidity Lock-up: Some restaking protocols impose lock-up periods for withdrawals. Check the withdrawal window for each vault to ensure your assets remain accessible if needed.
Verify smart contract security
Before deploying capital for cross-chain restaking, treat the smart contract audit as your primary insurance policy. The bridge infrastructure connecting these chains is often the weakest link; a single vulnerability can drain liquidity. You must verify that the protocol has undergone independent security reviews from reputable firms like Trail of Bits or OpenZeppelin.
Do not rely on the protocol's self-reported security. Check the audit reports directly. Look for any disclosed critical vulnerabilities and, more importantly, how the team resolved them. If a protocol is running un-audited code, the risk is unacceptably high.
Beyond the code, assess the economic security of the bridge. Review the Total Value Locked (TVL) trends over the last six months. Sudden drops in TVL often signal that sophisticated actors are exploiting a flaw or losing confidence. Confirm the bridge's historical security record; a history of minor exploits, even if patched, indicates a higher probability of future failure.
Finally, understand the slashing conditions specific to the restaking layer. If the validator misbehaves, your assets are penalized. Ensure you understand the exact trigger events and the severity of the penalty before you lock your funds.
Common cross-chain restaking errors
Even with careful planning, execution mistakes can trigger slashing or permanent loss. The following pitfalls are the most common reasons restaking positions fail during cross-chain transfers.
Choosing the wrong bridge
Not all bridges offer the same security guarantees. Many rely on trusted multisigs or bridges with lower TVL, increasing the risk of exploits. Always use bridges with proven security records, such as those supported by official cross-chain transfer protocols (CCTP) for USDC flows. Verify the bridge’s audit history and active security budget before locking assets.
Ignoring L2 gas limits
Layer 2 networks often have stricter gas limits and higher congestion during peak times. If you do not account for this, your transaction may fail or revert, leaving assets stranded on the source chain. Always check current gas prices and estimated confirmation times on the target L2 before initiating the restaking action.
Missing the slashing window
Cross-chain restaking introduces a delay between the source chain’s slashing event and the target chain’s awareness of it. If you fail to bridge back or respond within the specific slashing window, your position may be slashed without recourse. Monitor official announcements from the restaking protocol to understand the exact timeframes involved.
No comments yet. Be the first to share your thoughts!