Prepare your wallet and assets
Before attempting any cross-chain restaking 2026 transaction, you must ensure your wallet is fully funded on the source chain. Cross-chain operations require two distinct layers of liquidity: the asset you intend to restake and the native gas token required to pay for the destination chain’s transaction fees.
Secure native gas for the destination chain
A common mistake is bridging only the restaking asset (such as ETH or LSTs) without leaving room for gas on the target network. Most cross-chain bridges and restaking protocols (like Everclear) execute the final restaking instruction on the destination chain. If your wallet lacks the native currency of that chain—ETH for Ethereum, MATIC for Polygon, or BNB for BSC—the transaction will fail immediately due to insufficient funds for gas.
Always verify the specific gas token required by the destination chain before initiating the bridge. Keep a small buffer of this native token in your wallet to cover the bridge fee and the subsequent restaking transaction.
Verify wallet compatibility
Ensure your wallet (e.g., MetaMask, Rabby, or WalletConnect) is configured to the correct network for the source chain. Double-check that the contract addresses for the restaking protocol are correct, as cross-chain interactions often involve multiple smart contracts. A mismatched network or incorrect contract address can lead to permanent loss of funds.
Select a secure cross-chain bridge
Choosing the right bridge is the most critical decision when executing cross-chain restaking in 2026. A single vulnerability can drain your entire position, so you must prioritize security audits and verified volume over convenience or low fees. The landscape has shifted from simple wrapped assets to intent-based routing, but the core principle remains: trust the code that holds your funds.
Start by verifying the bridge’s security model. Look for bridges that have undergone multiple independent audits from reputable firms like OpenZeppelin or Trail of Bits. Check their track record for past exploits; a clean history is a good sign, but active insurance funds or bug bounty programs are better indicators of resilience. For intent-based bridges, ensure the solvers are decentralized and transparent, reducing the risk of a single point of failure.
Next, analyze the volume and liquidity. High daily volume often correlates with better liquidity and faster execution times. According to DefiLlama data from late November 2025, top bridges processed over $880 million in daily volume, signaling strong network activity [src-4]. However, do not chase volume blindly. Ensure the bridge supports the specific token and chain pair you need for your restaking strategy. Cross-chain restaking 2026 requires bridges that maintain deep liquidity on both the source and destination chains to minimize slippage.
Use the comparison below to evaluate the top contenders based on security, fees, and supported chains. This table helps you filter options quickly, focusing on the technical details that matter for restaking.
| Bridge | Security Model | Fee Structure | Supported Chains |
|---|---|---|---|
| Stargate | LayerZero + Fraud Proofs | Variable (low gas) | 30+ EVM & Non-EVM |
| Across | Optimistic Verification | Dynamic (intent-based) | 15+ L1 & L2s |
| Wormhole | Guardian Network + Audits | Network + Protocol | 25+ L1 & L2s |
| LiFi | Multi-vendor Aggregation | Aggregated (best rate) | 100+ Chains |
After selecting a bridge, always test with a small amount first. Verify that the restaking protocol on the destination chain accepts the bridged asset in the correct format. This step prevents failed transactions and ensures your restaking position is active before you commit significant capital.
Bridge assets to the destination chain
Moving your underlying asset to the destination chain is the foundational step for cross-chain restaking 2026. You cannot restake on a new network without first transporting your capital there. This section walks you through the specific execution steps for moving assets from the source chain to the destination chain using the selected bridge.
Navigate to the official website of your chosen bridge protocol. Ensure you are on the correct domain to avoid phishing sites. Click the "Connect Wallet" button and authorize the connection with your source chain wallet (e.g., MetaMask, Rabby, or Coinbase Wallet). The interface should display your current balance on the source chain.
Select the asset you wish to bridge (e.g., ETH, USDC) and the amount. Choose your source chain and the target destination chain where you plan to restake. Review the estimated gas fees and bridge fees displayed. Some bridges offer "fast" routes at a premium or "slow" routes that are cheaper but take longer to settle.

If you are bridging an ERC-20 token, you will first need to approve the bridge contract to spend your tokens. Click the "Approve" button, which will trigger a transaction in your wallet. Wait for the transaction to confirm on the source chain. Once approved, the "Bridge" button will become active.
Click the "Bridge" or "Swap" button to initiate the transfer. Confirm the transaction details in your wallet, including the gas limit and fee. This transaction locks or burns your assets on the source chain. You will see a pending status in the bridge interface as the message passes through the bridge's validator network.

Depending on the bridge technology, your assets may arrive automatically or require a claim. For optimistic bridges, you may need to wait for the challenge period to expire before claiming. For native asset bridges (like ETH bridged via a wrapped token), the assets should appear in your destination chain wallet shortly after the source transaction confirms. Verify the balance in your destination wallet before proceeding to restake.
When bridging, always double-check the destination network. Sending assets to the wrong chain can result in permanent loss. Use official bridge links from the protocol's verified social channels or documentation. For a comparison of available options, refer to reviews like the Best Crypto Cross-Chain Bridges in 2026 by Stablecoin Insider to ensure you are using a reputable protocol.
Deposit into a restaking protocol
Once your assets are on the destination chain, the next step in cross-chain restaking 2026 is to lock them into a compatible restaking protocol. This action activates your yield generation and staking security. You will interact with a smart contract to deposit your tokens, which will then be converted into Liquid Restaking Tokens (LRTs). These LRTs represent your staked position and can be used elsewhere in the DeFi ecosystem.
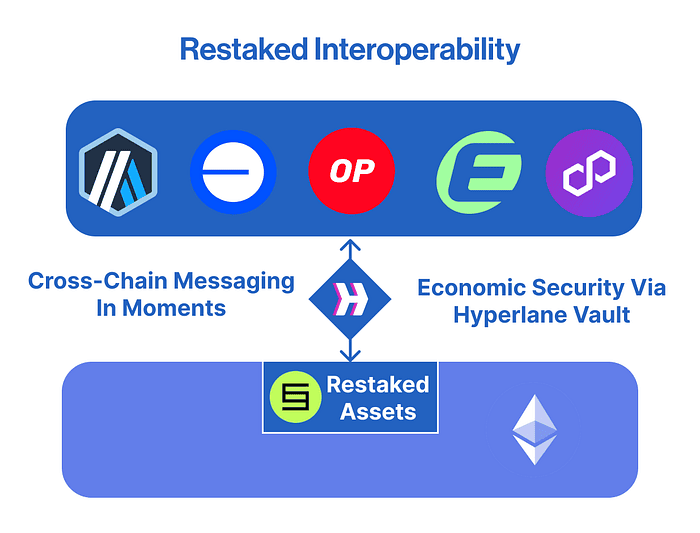
Start by connecting your wallet to the protocol’s interface. Ensure you are on the correct network and have selected the right asset pair. For example, if you are using Everclear, you would navigate to their cross-chain restaking module. The interface will display the available pools and current yield rates. Verify that the protocol supports the specific token you are depositing.
Enter the amount of tokens you wish to stake. Review the transaction details carefully, including gas fees and the expected LRT output. Confirm the transaction in your wallet. Once the transaction is confirmed on the blockchain, your tokens are locked in the protocol. You will receive LRTs in your wallet, which serve as proof of your stake. These tokens accrue yield over time and can be managed or traded as needed.
Always double-check the contract address and network before confirming any transaction. Mistakes in this step can lead to permanent loss of funds. After depositing, monitor your LRT balance to track your earnings. This completes the core action of cross-chain restaking, positioning your assets for yield generation.
Monitor and mitigate bridge risks
Cross-chain restaking 2026 relies on bridging assets between distinct networks, and bridges are the most frequent point of failure in multi-chain protocols. Unlike native chain interactions, bridging introduces counterparty risk from the bridge operator and smart contract vulnerabilities in the locking or minting logic. To protect your restaked position, you must treat bridge monitoring as an active, ongoing security practice rather than a one-time setup step.
Start by auditing the bridge’s trust model. Determine whether the bridge is permissionless (relying on cryptographic proofs like zero-knowledge rollups) or permissioned (relying on a set of multi-sig signers or federated validators). Permissionless bridges generally offer higher security guarantees because they do not rely on trusting a small group of operators. If you are using a permissioned bridge, verify the multisig wallet addresses and check if the protocol has undergone recent third-party security audits from reputable firms like OpenZeppelin or Trail of Bits.
Set up real-time alerts for bridge activity. Use block explorers like Etherscan or Arbiscan to create address alerts for the bridge’s main contract and treasury addresses. This allows you to detect unusual withdrawal patterns or large, unauthorized transfers immediately. Additionally, follow official announcements from the bridge protocol and restaking layer to stay informed about potential exploits or maintenance windows. Proactive monitoring reduces the window of exposure if a bridge is compromised.
- Verify the bridge’s trust model (permissionless vs. permissioned).
- Check for recent, reputable third-party security audits.
- Set up address alerts on block explorers for bridge contracts.
- Follow official protocol channels for exploit or maintenance updates.
Frequently asked questions about cross-chain restaking
Cross-chain restaking 2026 offers efficiency but introduces specific technical and financial risks. Below are answers to the most common questions regarding security, costs, and liquidity.
No comments yet. Be the first to share your thoughts!